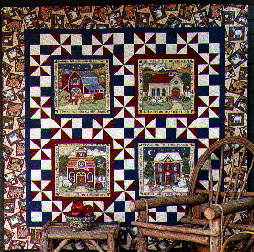
 FOUR PANEL
QUILT
FOUR PANEL
QUILTPanels dictated the size of the surrounding filler blocks. In this case, the panels were approximately 16" "square" ( a little lopsided). For strips of red and blue around each panel (2 surrounded by red, 2 by blue), I cut four 3" strips (the length of the fabric) of each color. Sew blue strips around 2 panels, red strips around other two panels. Square-up the resulting blocks to 18-1/2". Set aside.
Fabric
Piecing the 4 Patch Units -- you will need 21 units (will finish to 6" square).
Pinwheels -- You will need 24 units (will finish to 6" square).
I used my own method of constructing half-square triangle units. In actuality, I should have cut squares 3 7/8" and then those in half again (on the diagonal). But I like to give myself wiggle/mistake room. So, I cut them 4" square. I cut forty-eight 4 " squares of BOTH the red and the muslin. I laid a muslin on top of a red, right sides together, drew a pencil line on the diagonal on the muslin and sewed 1/4" along both sides of the line. THEN I cut these units in half on the pencil line. Pressed (with seam going toward the dark). Then using my 6" square ruler, I trimmed the units to 3-1/2". This way I can make them REALLY accurate--no wobbly seams.
PIECING THE QUILT
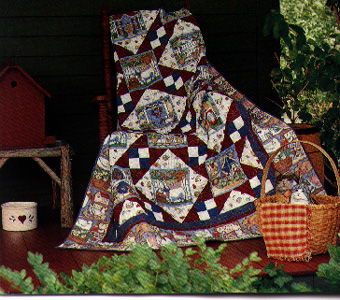
-- Following the quilt diagram, piece the 4 Patch blocks with the Pinwheel blocks into rows. The FIRST horizontal row begins and ends with a 4 Patch block. The SECOND row is comprised of a vertical strip of two Pinwheel blocks and a 4 Patch block, then a panel, then another 3 Block vertical strip, then a panel, then a 3 Block strip (see picture of quilt). Repeat the FIRST row, then the SECOND row, then finish with another FIRST row.
Borders : Blue fabric was cut 2" wide (finished
to 1-1/2")
Large print for outside was cut 7-1/2" wide.
 The size of the panel dictated the size of the surrounding
blocks. Fortunately, this panel was near to 7-1/2" (7"
finished). Of course, as is true of ALL panels, this was not a
true square. A little fudge room was allowed -- I cut some light
blue off one side (1/8" ) and went into the print outside
the light blue border on the other side -- I made that panel be
7-1/2" (I showed them who's the boss!).
The size of the panel dictated the size of the surrounding
blocks. Fortunately, this panel was near to 7-1/2" (7"
finished). Of course, as is true of ALL panels, this was not a
true square. A little fudge room was allowed -- I cut some light
blue off one side (1/8" ) and went into the print outside
the light blue border on the other side -- I made that panel be
7-1/2" (I showed them who's the boss!).
Piecing the TRIANGLE UNITS: Needed 38.
Cut nineteen 6-1/4" squares of the light fabric. Then cut
this square in half again on the diagonal -- yields 38 triangles.
Cut thirty-eight 5" squares of the red fabric. Then cut again on the diagonal -- yields seventy-six triangles. Sew 2 red triangles to the 2 short sides of the light triangle. Trim to 1/4" along the red long seamed side (I use larger red triangles so I have a little squirm room). New unit should (must) measure 4-1/4" x 8".
Piecing the 4 Patch Blocks -- Cut strips 2-3/8" wide of muslin & blue. Seam together. Recut into 2-3/8" wide units. Piece two units together to make 4 Patch. Note : I placed the muslin square of the 4 patch closest to the red star unit. The dark blue square of the 4 Patch fell next to the light print -- better contrast. The finished size of the 4 Patch is 3-3/4" (due to the panel being 7" finished). You need twenty-four 4 patch Blocks.
CONSTRUCTION -- Click here to see graphic of quilt piecing
I sewed in rows across. I had 3 separate units:
When my units across were constructed, I then joined my rows horizontally. Quilt so far measures 33" x 53".
Borders
Red: cut 5 strips 1" wide. Seam where necessary.
Sew to side of quilt.
Blue : cut 5 strips 2" wide. Seam where necessary. Sew to red edge.
Final border: Cut 6-1/2"
Quilt measures 49" x 69"
Back to Quilting Lessons page