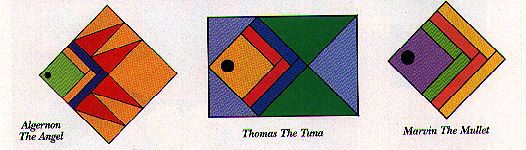
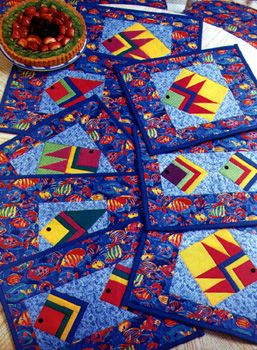
I live in a very old house with a very old shower door in my bathroom. And on this glass door are some very interesting etchings of fish which I have often considered as motifs for a quilt block. Why not? They look simple enough, I thought one day, and off to the sewing room I went. Three different patterns emerged, all starting with the basic central square, surrounded by two sets of thin strips like a half-log cabin block. Remembering some bright, vibrant fish swimming in a tank in a restaurant gave me the idea to make my fish blocks using the same hot, tropical colors. Pull out your brightest, hottest solid colors and sew along with my simple instructions below. Click here to see all placemats in color!
Placemat Size: 12" x 14"
Fabric Requirements:
scraps of bright solids
1/2 yard of light blue "water" fabric
1 yard fish print
backing fabric
batting
BONUS!!For a 6" (Mac), 4-1/2" PC pattern ofAlgernon the Angelfish, Click Here!
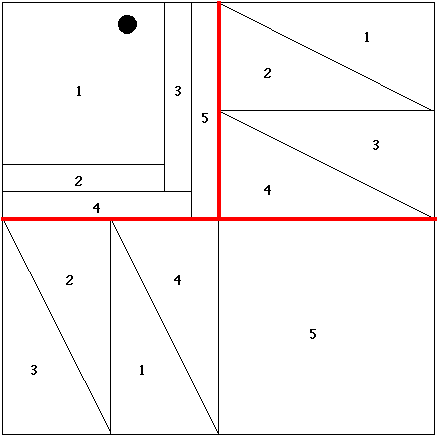
Step 1. All three fish blocks begin with a
2-1/2" cut square of fabric.
Step 2. From first contrasting bright color cut several 1"
strips. Sew two strips of one color to right side of fish "face"
from step 1 in a half-log cabin manner. Trim excess. Block now
measures 3".
Step 3. From second contrasting bright color cut several 1"
strips. Sew two strips to Step 2 block in half-log cabin manner.
Trim excess. Block now measures 3-1/2".
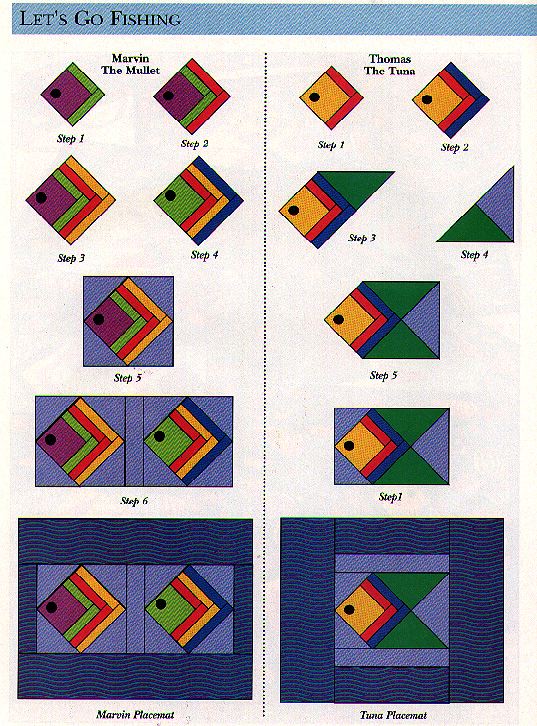
Marvin
the Mullet block
Step 4. To finish Marvin the Mullet, add four triangles cut from
one larger square that measures 4-1/4". Use the light blue
"water" fabric. Cut this 4-1/4" square along both
diagonals to yield the four triangles needed. Sew these triangles
to all four sides of the Marvin the Mullet center. He is done!
Thomas
the Tuna
Step 5. To finish Thomas the Tuna, begin with a unit pieced up
until Step 3. To add the two brightly colored triangle fins, cut
a 3-7/8" square of a third contrast fabric. Cut this once
along the diagonal. Cut a 3-7/8" square of water fabric and
bisect along diagonal. Use one of these triangles. Piece together
the Step 1-3 block, ONE water triangle, and the two triangles/fins
from step 5 following the diagram.
To finish Thomas The tuna, cut a 4-1/4" square of water fabric. Bisect twice along its diagonals. We will use two of these resulting triangles to square up our Fish Block. These will be attached to the top and bottom side of his "face".
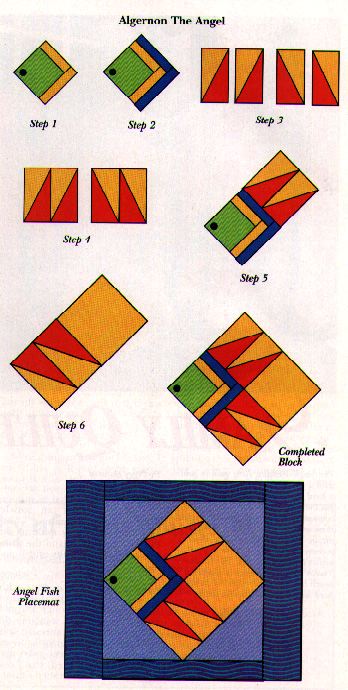
Algernon
The Angel
Step 6. Working from his pieced face, steps 1-3) we will add a
cut 3-1/4" square of fabric which matches his face fabric.
We need four half-rectangle triangles which also match his face
fabric. Cut these from two 2-3/8" x 4" rectangles. Also
cut two 2-3/8" x 4" rectangles from another bright fabric
which will be his fins..
Step 7. Using one rectangle of each color, layer them right sides up with the light color (non-fin color) on top. You have two piles with two rectangles in each pile. Cut one pile along the diagonal from the top left to the bottom right. Cut the other pile along the diagonal from the top right to the bottom left.
Step 8. Piece these contrasting sets together to make four sets of fins.
Step 9. Finish piecing Algernon The Angel by sewing his face, four sets of fins, and 3-1/4" square.
Step 10. From the water fabric cut a 7-1/4" square. Sub cut into four smaller triangles by cutting along both diagonals. Use two of the triangles to complete Algernon the Angel by sewing to top and bottom side of his face.
Placemat
Construction
Step 11. Using spacer strips cut from the water fabric (ie, 1-1/2",
2", 2-1/2"), lay out fish blocks in a pleasing manner.
You may have three of Marvin the Mullet in one placemat or mix
one with another. Add these spacer strips to separate fish so
they appear to be swimming.
Step 12. From the fish novelty print fabric cut wide border strips. I cut mine to measure 3" for the the top and bottom and 4" for the two sides. My placemats measured 12" x 14". Yours can be any size your table allows!
Step 13. Layer finished placemat/quilt top with thin batting and backing fabric. Pin baste. I machine quilted my four placemats using a meandering stitch to simulate the waves of the ocean!
Back to Quilting Lessons Page